Monday, August 15, 2011

Blueberry Banana Bread


Last month, I hosted a Pampered Chef party at my house.  We had alot of fun, with good friends and good  food!  The consultant made a really yummy mango salsa to start with, and then she showed us how to dress up chicken breasts with Pampered Chef spices.  I made this delicious Blueberry Banana Bread (in my Pampered Chef stoneware loaf pan), and my Roasted Beet and Pear Salad.  Everybody had a great time, and I got many requests for the bread recipe, so I thought I would share it with you all too! :)

I also wanted to thank everybody who came to the party, and everybody who ordered even if they couldn't make it.  Because of you guys, and the awesome hostess bonus that Pampered Chef offered in July, I got a whopping $440 worth of free products!!!  I also bought a couple of the bigger items at a discounted price, so I ended up with almost a whole new kitchen! :)  Here's a picture of all the stuff I got.  So thanks again!


Now for the bread recipe.  I have tried several banana bread recipes...some good and some not so good. :)  But this one is the best one I have made.  It's always gone in just a day or two!  It's delicious warm or cold, plain or slathered with butter! (That's the way I like it! :D)


Blueberry Banana Bread

2 cups flour
1 teaspoon baking soda
1/2 teaspoon salt
1/2 cup shortening
1 cup sugar
2 eggs
2 teaspoons vanilla extract
2 medium bananas, mashed
1 cup fresh blueberries

Preheat oven to 350°. In a mixing bowl, combine the flour, baking soda and salt; set aside.  In another bowl, cream the shortening and sugar.  Add eggs and vanilla; mix well.  Stir in the bananas.  Slowly add the dry ingredients, and mix until just evenly moistened.  Gently fold in the blueberries.  Pour into a greased loaf pan.  Bake for 1 hour, or until a toothpick inserted near the center comes out clean.  Remove to wire rack to cool.  Slice, slather with butter, and devour! ;)


P.S.  This is also a really fun recipe to make with your kids!  Chance loves to help me make this...and eat it! :)

Monday, August 1, 2011

Watermelon Mint Lime Slushy / How to Cut Up a Watermelon

Well, sorry for my long absence!  I know some of you have been faithfully checking this blog, and I want to let you know I appreciate it!  We aren't going to have internet at our house in the near future, so I don't know how often I will blog, but I will try to get some posts up every once in a while! :)


Here's a yummy drink recipe for summer...now that it's half over. :P  We've been enjoying lots of fresh watermelon the last month or so! When it's cheap and in season, why not have it all the time?  Someone once told me that watermelon was expensive, but pound for pound, it is some of the cheapest produce you can buy. :)
Before I share the drink recipe, I'm going to quickly show you how I cube a watermelon.  Most of you probably already know this, but when I saw it the first time, it was like a lightbulb turning on in my head.  It's super easy to cut a watermelon this way!
First, cut the melon in half.  Then place one half, cut side down on a cutting board.  Now take your knife, and cut then end off, just enough to get all the rind off.


Then start to cut the rind off the sides, kind of sliding your knife down in a curving motion.


When you have all the rind cut off, trim all the white and light pink off.  As you can see, I didn't do the best job of this...I had a little boy demanding my attention when I was trying to cut this up and take pictures!   Then cut the watermelon into approximately one inch slices.  I fanned them out a little so you could see what I was doing, but I usually just leave them stacked.


So, line them all up, and start slicing down in one inch strips.  I know the watermelon looks alot pinker in these pictures...I had to switch cameras in the middle of it all!


Then, turn the watermelon a quarter turn, and repeat.  And you have cubed watermelon!


One of the things I like to make with watermelon is this refreshing slushy!  This is another of those recipes that I don't have exact amounts for, because I usually just thow everything in my juicer!


Watermelon Mint Lime Slushy

About 1/4 of a medium seedless watermelon
1 lime
1 small bunch fresh mint leaves
Sugar, to taste
Ice cubes

Cut the watermelon in chunks, and feed into your juicer, alternating with lime (rind and all) and mint.  Pour the juice into your blender and add sugar if desired. (depending on how sweet your watermelon is!)  Add ice cubes, and blend until slushy consistancy.  Pour into glasses, top with a mint spring and enjoy!

Saturday, May 7, 2011

Cajun Catfish Cakes

The past week has been quite a week for us!  I had all four wisdom teeth removed last Friday, so things have been a bit out of whack around here!  For the first couple days, I pretty much stayed in bed.  And since then I have been getting back around to cooking and such, but I still have to eat fairly soft foods.  So this yummy recipe came in handy this week!  I usually make this with cod, but that seems to be harder to find these days, so I tried it with catfish, with great results!  I think any mild white fish would work.  We ate these with our first big pickin' of green beans from our garden.  Delicious!


Cajun Catfish Cakes

2 cups potatoes, peeled and cubed
1/4 cup onion, chopped
2 cloves garlic, minced
3 or 4 catfish fillets, cubed
1 tablespoon butter
2 tablespoons fresh parsley (or 1 tablespoon dried)
1 egg
1/2 teaspoon Lawry's Salt
1/2 teaspoon pepper
2 teaspoons paprika
1 tablespoon Cajun seasoning
1 cup saltine cracker crumbs
Flour, salt and pepper

Boil the potatoes, onions and garlic in water until potatoes are nearly tender.  Add the cubed catfish and continue boiling for about 5 more minutes until both the potatoes and fish are soft.  Drain well.  Mash together with the butter and egg.  Stir in seasonings and then cracker crumbs.  Scoop the mixture with an ice cream scoop and form into cakes.  Dip in a mixture of flour, salt and pepper.  Fry in butter (or oil) until browned on both sides.  Serve hot with tarter sauce, if desired.  Enjoy!

Shared at Little House on the Prairie Living http://www.littlehouseliving.com/2011/05/old-fashioned-recipe-exchange-517.html

Tuesday, April 26, 2011

Making a Baking Soda Volcano!


A couple days ago, Chance was bored, so I was trying to think of something fun to do with him.  Lately, we've had a few natural phenomena nearby...wildfires, thunderstorms with hail, and tornados...so Chance has been really interested things like that.  I remembered making baking soda volcanos as a child, so I thought it might be fun to make one with him!  I'm pretty sure it's the only volcano that will be erupting around here, though! :)

You can make one just in a glass if you want it to be a quick project, but I was wanting to actually build one, which turns it into a 2 or 3 day project.  Here are the things you will need to make a volcano like we did...

Large paper plate
Jelly jar
Old newspaper
All-purpose flour
Water
Paint and brushes

Warm water
Liquid dish soap
Food coloring
Baking soda
White vinegar

To start, I put the jelly jar in the middle of the paper plate.  Then I crumpled up about two sheets of the newspaper and wrapped them around the jar, to form the base of the volcano.  Take another two sheets or so of the newspaper, and rip it up into smallish strips.  In another plate, or bowl, make a paste of flour and water.  Use about 1/2 cup flour and 2/3 cups water.  Dip the strips of newspaper into the flour paste, and spread over the crumpled paper.  Continue layering the pasted paper to form a volcano shape around the jar.


When you have the shape you want, you need to let it dry at least overnight.  When flour paste doesn't dry all the way, it tends to mold.  Chance tried to dry it faster with a hair dryer, but we still had to let it sit until the next day. :)


The next day, when the paste has dried, you can paint it!  Chance chose 5 colors for his...black, dark brown, light brown, antique copper and green.  But you can paint it any color(s) you like!


Chance being a clown for the camera. :)

After the paint dries, you can make the volcano erupt!  In a glass, mix together about 1/2 cup of warm water, a couple drops of liquid dish soap.  The soap helps hold the bubbles and makes the eruption much better! Add a few drops of the food coloring of your choice, and about a tablespoon of baking soda.  Stir slowly to mix.  Pour this mixture into the center of the volcano.


Then it's time to add the magic ingredient!  You just need a couple tablespoons of white vinegar.  Have you child pour it into the volcano and watch the eruption!


And again...


and again...


and again!


Have fun!

Friday, April 22, 2011

Greek Tofu (or chicken) Spaghetti


A few weeks ago, we had a friend over that didn't eat meat.  I wanted to make something very tasty and healthy for supper, so I took a recipe that I usually make with chicken, and made it with tofu instead.  I know tofu doesn't sound all that great to some of you, but I discovered that I like it way better than chicken in this recipe!  Tofu is great for soaking up all the flavors of what you cook it with.

I love this recipe because it is fairly quick, super healthy and packed with protein.  And also because Greek/Mediterranean food is one of my latest addictions! :)  Serve it with a Greek salad, soft pita bread, and hummus!  Yum!


Greek Tofu Spaghetti

1 package medium firm tofu
1/4 cup red cooking wine
2 garlic cloves, minced
2 teaspoon finely chopped oregano
2 teaspoon finely chopped basil
1/8 teaspoon salt
1/8 teaspoon pepper
1 tablespoon olive oil
1/2 cup chopped onion
1/2 cup chopped sweet red pepper
2 cups fresh baby spinach
1/2 cup marinated artichoke hearts, drained
1/3 cup chopped, pitted Greek olives
Feta Cheese
Whole grain spaghetti noodles, cooked as directed

Start by cutting the tofu up into 1/2 inch cubes.  Add the next 6 ingredients, stir, and marinade for about half an hour.  (When you stir the tofu up, it will crumble a bit, and even more when you cook it.)  Saute the onion and pepper in the ollive oil for just a couple minutes until the onions get a little translucent.  Add the tofu mixture and continue to fry for about 5 minutes, stirring occasionally.  Stir in the baby spinach, artichokes and olives, and cook until the spinach has wilted.  Serve over spaghetti noodles, and sprinkle with feta cheese if you like.  Enjoy all the wonderful flavors!!

Good gracious, this is making my mouth water!  I shouldn't be blogging while I'm hungry! :)

Monday, April 18, 2011

Watering System for our Garden


Howdy!  I can't believe it has been two weeks since I have blogged!  The weather has been turning 'summery' around here, so we have been busy with all that comes with that!  Here are just a few of the things that have been keeping us busy!


Since I posted about our garden, we have had several questions about our watering system, mulching methods, etc.  So I asked my husband to write a post about how he set it up and and how it works.  Please click on the pictures to view them larger if you want to see more detail!


Hi. I'm Loren. I'm not so handy in the kitchen, but I fix motors, and build stuff. Our simple, really basic garden plan somehow morphed into one with beds.  We have been in drouth since the beginning of the year, so I figured irrigation was going to be an issue, since we are on city water. Needless to say, the garden has turned into quite the project! 

I will cover the watering system first, and I should mention that I am not a irrigation expert. I have a lot of irons on the fire and consequently I have simply made something that fits our situation and allows me to “set it and forget it.” A programmable water timer makes it much easier for busy folks to have a garden.


First, I made a supply line using ¾ inch diameter PVC pipe and fittings that I ran on top of the ground as there is not an existing line and spigot to where I needed it. (I prefer gluing PVC using purple primer first, then the glue).  The programmable timer is just outside the back door. 


Once at the garden the I made it so that each side of the garden was supplied.  There are several turn-off valves that allow us to shut off water completely, or run each side of the garden independently.  I also had an problem with losing water pressure by the time I got towards the back of the garden, but I fixed that by connecting both ends to make a complete circuit around the garden.


 I then used ½ inch drip line to branch off of the PVC. Each ½ inch line supplies two beds.  I bent it in kind of a horseshoe shape underneath the beds. Coming off of the 1/2 inch line I used ¼ inch drip line for plant specific watering.

(I don't have a picture of this since the beds we did this in are mulched, but here is a picture of our corn patch, where we did something very similar)


In some cases, I opted to use sprinklers made for ¼ inch line- like the seed planted green beans and beets because we haven't mulched those beds and there wasn't much need to be plant specific in those cases.


The neat thing about this is that I can change anything about this watering system to fit new conditions, or additions to the garden... and I have several times. It has taken a bit of money to do, but we are using less water- or at least more of it is benefiting the plants than a regular lawn sprinkler.

A couple of money saving tips!!! If you do this sort of system, you will be spending enough money on drip line, connectors, and sprinklers. There are all kinds of little doodads out there and if they fit your needs by saving your time and or efforts, they are probably worth spending money on, but here are some things I did to avoid spending so much.

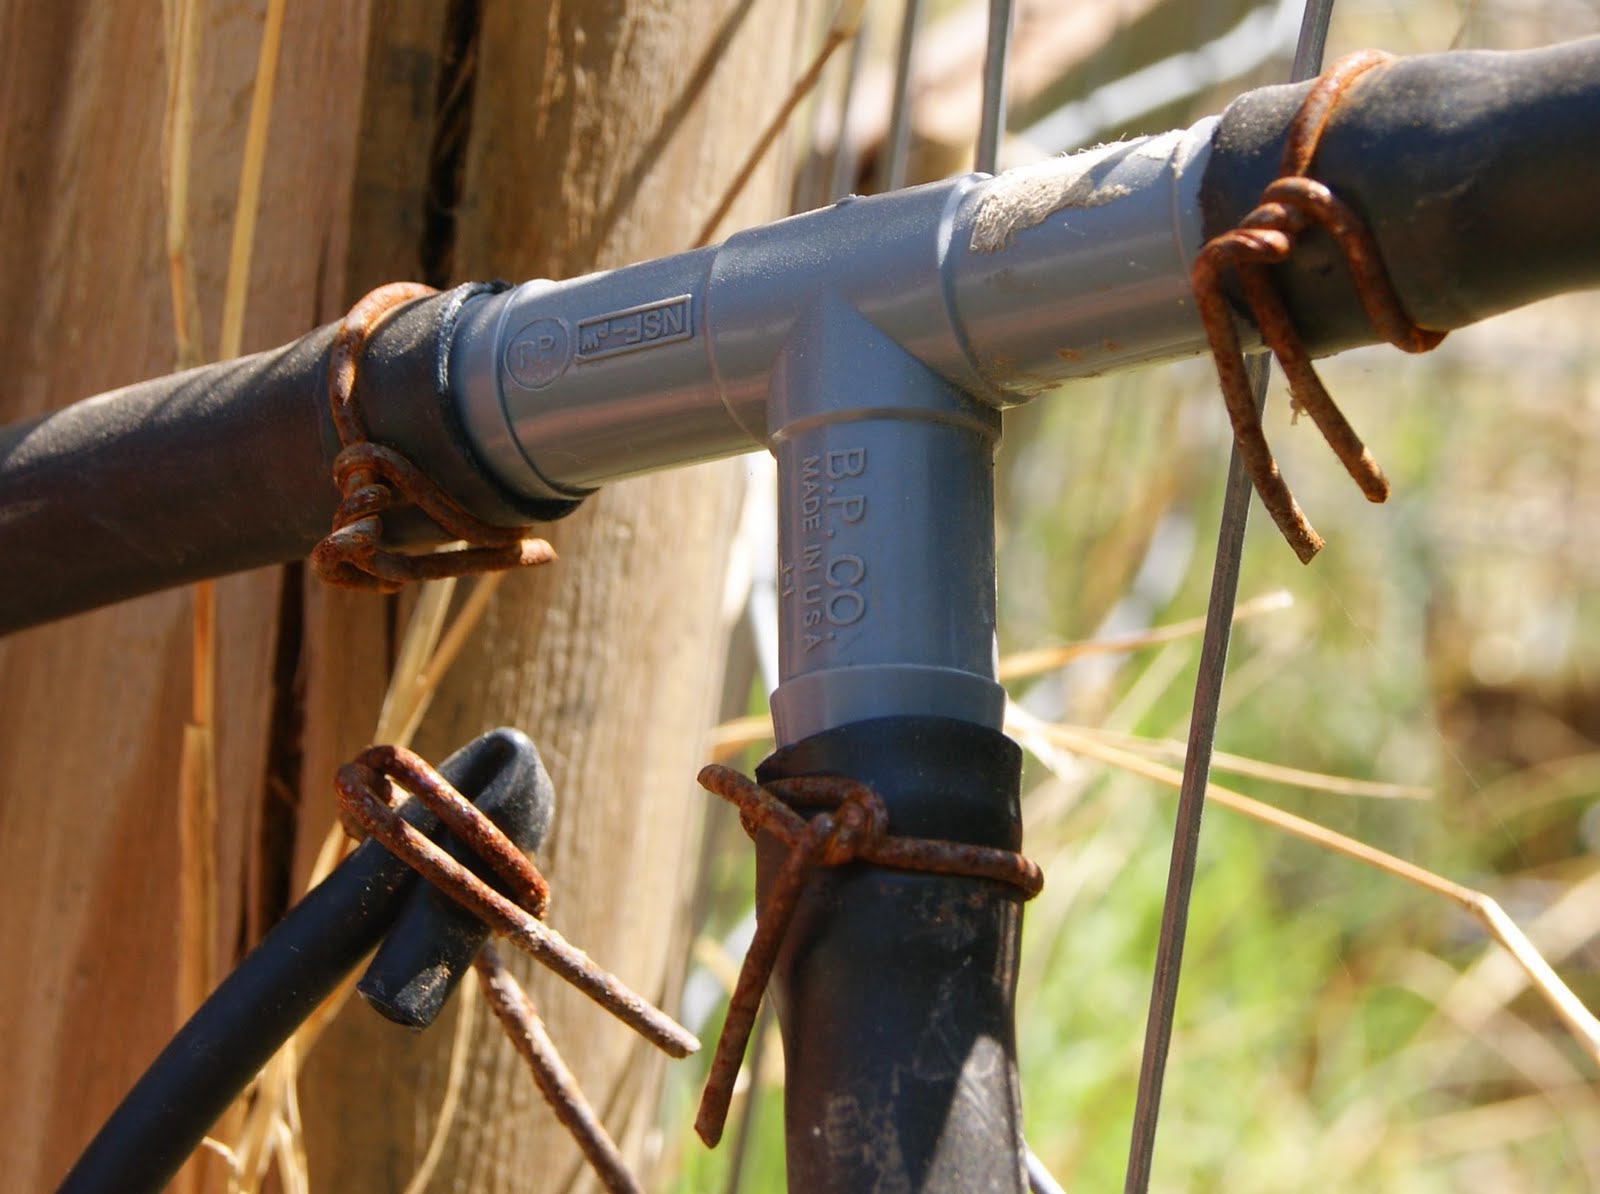
Tip 1: End clamps~ all you have to do is fold a couple inches of line back on itself. I use old baling wire or metal clothes hanger pieces to crimp around the fold to hold it. Twine or duct tape would also work.


Tip 2: ½ in lines tend to come off of their fittings pretty easily when there are sudden changes in water pressure, mostly when the water system turns on and the lines are refilling. Regular hose clamps aren't cheap anymore. Here again old baling wire comes in handy. Just a loop and a couple of twists with a pair of pliers and you are in business.


Tip 3: Drippers~ unless you are concerned about being very specific/scientific about the amount of water you are putting out and want to spend a lot of money buying all those ½ and 1 or 2 gallon per hour deals, a bunch of light poke holes in ¼ or ½ inch drip lines with a thumb tack works really well. Then you can control volume and pressure of that whole run of line with a little in line valve.


Mulch: If you have a yard that gets mown regularly, use the clippings as mulch. That's what we are doing and it works great.  Our mulch was mostly dead grass and dry leaves from the first cutting after winter. We have mulched in our herbs, tomatoes, peppers, peas, and side dressed the cucumbers, and squash which are in hills. The soil is cooler underneath the mulch, weeds get smothered to some degree, and the water is retained by the soil longer requiring less water usage.


Note: Using dry grass clippings, as opposed to fresh, is a good idea. This is because of the microbiological processes that take place in digesting and breaking down of your clippings. Basically, Nitrogen that is in your soil helping your plants grow also helps the microbes grow. These microbes are good things, but as microbes grow exponentially, they will use the Nitrogen faster than your plants, depleting it. Then your plants won't be as thrifty. Just use google if ya'll want an in depth chemistry/biology explanation.

I hope this answers some of your questions, but if you have any more, just leave a comment, or e-mail Rachel at domesticdoins@hotmail.com.

Saturday, April 2, 2011

Grilled Lemon-Basil Chicken

Imagine sitting out on the front porch, listening to the cardinals singing, and watching the flag wave gently in the breeze.  The weather is just at that perfect temperature where you are neither hot nor cold.  Before you on the table is a mason jar of iced tea sweating slightly in the warm air.  You are served Lemon-Basil Chicken straight off the grill, with packets of grilled vegetables, seasoned to perfection with butter, salt, garlic and lemon pepper.  On the table is a large bowl of spinach salad, fresh picked from the garden, with luscious strawberries and crunchy candied almonds, smothered in a tangy sweet creamy poppy seed dressing.  Right beside it is a plate of fresh yeast rolls, still steaming from the oven.


That, my friends, was our perfect  meal tonight.  And now, I want to announce the opening of my restaurant.  Just kidding. :D  But I do want to share this wonderful recipe with you.  This is the perfect spring/summer meal.  I can't wait to have company so I can serve it to them and listen to the oohs and aahs! 


Just another note before I give you the recipe...This is my new favorite basil plant.  It is called Spicy Globe Basil, and it is wonderful!  It is a compact plant, so it would be great for containers.  You could probably even grow this on your windowsill.  The leaves are tiny, so in some recipes like this chicken, you don't even have to cut them up!  This plant is definitely going to be my go-to basil for cooking!

And now, here is the recipe for Lemon-Basil Chicken. This recipe is for 3 chicken breasts, but it could easily be doubled.  I like to use aluminum foil when grilling chicken to keep the meat from drying out or getting too charred.


Grilled Lemon-Basil Chicken

1 tablespoon firmly packed basil, chopped
1 tablespoon olive oil
1/8 cup lemon juice
1 teaspoon grated lemon peel
1 tablespoon white wine vinegar
2 cloves garlic, minced
1/2 teaspoon salt
1/4 teaspoon pepper
3 boneless skinless chicken breasts

In a medium bowl, combine the first 8 ingredients.  Add chicken breasts, turning to coat all sides, and marinate in the refrigerator for 4 hours or longer.  When ready to grill, cut 3 sheets of aluminum foil, about 15 inches long.  Place each chicken breast in the middle of a sheet of foil, and fold the foil around the chicken to seal.  Grill over medium heat for 5 minutes per side.  Remove the foil and grill for 2 1/2 minutes per side.  Serve hot!


This recipe was added to Seasonal Sundays at the Real Sustenance Blog.  Check out the other great recipes!  http://realsustenance.com/seasonal-sunday-04-03-11/

This recipe was added to the Old Fashioned Recipe Exchange at Little House on the Prairie Living.

Gardening in Small Spaces


My sister-in-law asked me to do a guest post for her blog, Little House on the Prairie Living this week, so I did this one on gardening. I live farther south than she does, so we are a couple months ahead when it comes to gardening.  We already have everything planted, and most of it is up and growing better than the weeds!  We have what most people would consider a small garden. It is only about 17x30 feet. But we like to pack it full of produce! I am going to share some of the things we do to get more out of our space.


  One of the things we did was put a fence around the entire garden.  That way, we can plant climbing vines, such as peas and cucumbers around the edge of the garden, so they don't take up space in the middle.  This year we planted the peas on the outside of the fence so we don't accidentally kick or step on them while we weed the other garden beds.


We divided the garden into 4x6 and 6x6 foot beds.  They aren't exactly 'raised beds', but my husband did build some frames out of 1 inch thick wood to keep the beds contained and the walking paths defined.  He also built a watering system so that each individual bed gets water, and we don't waste as much water.


Within the beds, you can plant pretty aggressively, since you don't have to leave room for walking.  This works especially well with plants such as beets and bush beans.  We planted beans on a diagonal grid, so each seed is about 4 inches away from the others. 


This way, when the beans grow, they are close enough together to help support each other.  Also, they shade the entire bed, so that the weeds don't grow!  Last year we had two 4x6 beds of beans, and they produced so well, that I froze about 2 quarts of beans every other day, besides what we ate, for several weeks!


I would definitely recommend planting beans this way, even if you do not plant in beds.  If you plant in rows, make your rows 1, 2 or even up to 4 feet wide.  You will get so much more out of your space!


The same thing goes with beets, carrots, radishes, etc.  My husband planted the beets this year, and he planted them fairly thickly in rows about 4 inches apart.  He figured he planted the equivalent of a 72 foot row in a 4x6 bed!  When they get a little bigger, I will thin some of them out, and eat them in salads.  Then, when they are bigger yet, I will thin them some more and eat them as baby beets and greens.  What's left will be in a diagonal grid like the beans, to grow into big beets to freeze or can!

Hopefully this has given you some ideas for your garden!  If you have any questions, you can leave a comment here, or e-mail me at domesticdoins@hotmail.com.  I plan on having more gardening posts here in the future, so check back often!  Happy gardening!

Tuesday, March 29, 2011

Azure Standard Giveaway


Azure Standard is a food co-op that delivers wholesome and organic foods and produce.   You can read all about them here.  They have truck drop-off points in all of the western states and are moving farther east! 

This week they are having a giveaway on their blog!  The winner will recieve 10 Wholesome Sweeteners!  To enter, go to the Azure Almanac Blog at http://azurestandard.blogspot.com/2011/03/giveaways-dont-get-any-sweeter-than.html

The giveaway ends at 12:00 AM Saturday, April 2nd, 2011.

Monday, March 28, 2011

Southern Style Cornbread


Growing up in the Midwest, cornbread was baked in an 8x8in baking pan and was moist, sweet and cake like.  We ate it with syrup or molasses, and sometimes we even baked hot dogs in it!  But when I married a southern boy, I learned that cornbread is a whole 'nother thing down there!  In the South, cornbread is often baked in an iron skillet, doesn't have any sugar in it, and is a bit drier and coarser than the Midwest variety.  Since I married a Southerner, I had to learn to make it 'right'. :)  But over time I have learned to love this Southern staple.  Although I do add some sugar to mine... just don't tell anybody. ;)


First, pour a couple of tablespoons of oil into a large cast iron skillet.  Put the skillet in the oven and preheat the oven to 375°.  By the time the oven is preheated, your pan will be nice and hot!  Meanwhile, mix together the dry ingredients.  You can tell how much I use this recipe, I think it is the most stained one I have. :P


Add the wet ingredients and stir until evenly moistened.  Remove the skillet from the oven and pour the batter into it.  The skillet should be hot enough to sizzle and start cooking the edges.


Put it back in the oven and bake for 30 minutes.  The cornbread should come out golden brown and slightly crunchy/crsipy on the outside and soft on the inside.


Serve hot with your choice of toppings.  I love to eat it with butter and honey.  It's also a great side to a pot of beans!  Don't worry, the picture below isn't a mold science experiment, I made a batch with blue cornmeal! :)


Southern Style Cornbread

1 1/2 cups cornmeal
1/2 cup flour
1 teaspoon salt
1 tablespoon baking powder
1/4 cup sugar (optional)
1 tablespoon oil
1/4 cup milk
3/4 cup water
1 egg

Pour a couple tablespoons of oil into a large cast iron skillet.  Place in the oven and preheat oven to 375°.  Meanwhile, mix together the dry ingredients.  Add wet ingredients and stir until evenly moistened.  When the oven is preheated, remove the skillet and pour the batter into it.  Put it back in the oven and bake for 30 minutes.  Cut into wedges and serve hot.  Enjoy!

This recipe is entered in the Old Fashioned Recipe Exchange at Little House on the Prairie Living.  http://www.littlehouseliving.com/2011/03/old-fashioned-recipe-exchange-329.html

Tuesday, March 22, 2011

Small Town Festival


Every St. Patrick's Day weekend, our town has a big festival.  There's a stew cook-off, dog show, costume contests, and beauty pageants.  A parade, highland games, stock car races, a karaoke contest, a rodeo and a carnival.  It's a pretty big deal for a small town!  We didn't get to alot of it, because we were busy having a yard sale, but we did get to some of it!  I thought I would share some photos from a small town festival!  These are some of the things I love about a small town.

As soon as the sun came up, there were trucks and trailers and horses everywhere!  The parade started at the football field right across from our house, so we got to watch all the riders get ready!


Then my hubby handled the yard sale so I could take Chance to the parade.  There was the Dr Pepper truck...


The bikers...


The firetrucks...


The little Vaqueros...


And the bigger ones...This horse was gorgeous!


And of course, we love our Veterans!


And our farmers...


And here are the brave Scots who played the Highland Games...


And a clown...


And little princesses waving at big ones. :)


This picture had some color issues I couldn't fix, so I made it black and white.  I thought Chance's expresssion was adorable!  Of course he was part of the scramble to get the candy all the floats tossed out, so he was pleased with his sucker. :)


Then later, my husband took Chance to see the Highland Games.


Lots of men in Tartan!


And they do some really crazy stuff...


Then we all went to the carnival and had a good time!  I know it's a big waste of money, but it's worth making memories sometimes!  Chance had never been to a carnival before, and he had some gift money burning a hole in his pocket. :) 

So we blew some money on carinval food...


And Rides...


Altogether, we had a great day...the small town sort of way!