Friday, August 27, 2010

Ice Cream Monster

We had to go to the big city today for an appointment.  Afterwards we ate at a really good Mediterranean Grill.  I didn't bring my camera in, otherwise I'd show you a picture of the huge amounts of food they served us.  It was all really good.  I tell ya, that was the first time I've really liked eggplant.  :)  Chance wasn't so sure about all the new flavors though, so we had to bribe him with the promise of ice cream if he ate.  He did pretty good for a three year old!  But when we walked down the sidewalk to the ice cream place, he really came alive!


And he wasn't the only one...


We need to get out more.

Thursday, August 26, 2010

Roasted Beet and Pear Salad

You must try this salad!

This is by far my favorite way to eat beets, and I love beets.  I can't really describe this salad, so you'll just have to make it and see.  It's just that good. :)


First you need a few beets.  If you have large beets, just one or two will do.  I like to make a big batch, because I can eat this salad for every meal.  Wash and peel the beets.  Where you cut off the stems you should have a somewhat flat area.  Place the beet with that down on the cutting board and make fairly thin slices (between 1/8 and 1/4 inch).  Keep all the slices together and turn the beet a quarter turn.  Repeat slicing until the whole beet is cut into julienne strips.  If you like, you can slice them all in half so they aren't so long.  Do the same with as many beets as you want.

Next, toss the beets in a couple tablespoons of olive oil.  Stir them around so they are all coated.  Put into a baking pan and roast in a 350ยบ F oven for about 20 minutes.  Stir occasionally so that the ends don't burn.  Once they are soft, remove them from the oven.  They should look something like this...


Set aside and let cool completely.  You can roast the beets a day or two before you plan to make the salad.  If you roast enough you can have hot beets one day and the cold salad the next. :)

When you are ready to make the salad, put some Spring Mix salad greens on a plate.
  (Variation: If you are serving this to a crowd, you can layer the greens with the pears, walnuts and beets in a large bowl.  I've done about three layers of each, then poured the dressing over the top)

Arrange the pears (sliced or chunked) on top of the lettuce, followed by walnuts, and beets. I also love to add Chavrie soft goat cheese, but my husband won't touch the stuff.  I think it makes the difference in a salad being just good, or being amazing.  But that's just me. :)  Drizzle the salad with the red wine vinaigrette.  Then close your eyes and just enjoy the flavors!

Roasted Beet and Pear Salad

Spring Mix salad greens
2 - 5 beets, julienned and roasted
1-2 tablespoons olive oil
2 ripe pears, sliced or chunked
1/2 cup walnuts ( toasted, optional)
Chavrie soft goat cheese (optional)

Dressing:

3 tablespoons red wine vinegar
2 teaspoon Dijon mustard
2 teaspoons honey
1/8 cup lemon juice
1/4 cup olive oil

To make the dressing, mix vinegar, mustard, lemon juice and honey until blended.  Add the olive oil slowly while whisking until the dressing thickens slightly.


Monday, August 23, 2010

Orange Breakfast Rolls

     We don't eat too much sugar around here, but once in a while we like a sweet treat.  Especially when we have company.  Unfortunately for my waistline, we've been having company a lot lately! ;)
     These sweet rolls are a nice change from regular cinnamon rolls.  They are bright and citrusy.   The lemon glaze gives you a little more 'wake you up' kick.
     I made these in my bread machine, but you can also make them the other way. I'll post the instructions for both methods.  I like to put the rolls on top of my toaster oven, with it turned on low, to help them raise.  Works like a charm. :)


Orange Rolls

2 1/4 teaspoons active dry yeast
1/4 cup warm water (110° to 115°)
1 cup warm milk (110° to 115°)
1/4 cup shortening
1/4 cup sugar
1 teaspoon salt
1 egg, lightly beaten
3 1/2 to 3 3/4 cups all purpose flour

Filling:
1 cup sugar
1/2 cup butter, softened
2 tablespoon grated orange peel

Glaze:
1 cup confectioners' sugar
4 teaspoons butter, softened
4 to 5 teaspoons milk
1/2 teaspoon lemon extract

Conventional method: In a small bowl, dissolve yeast in water. In a large bowl, mix milk, shortening, sugar, salt and egg. Add yeast mixture and blend. Stir in enough flour to form a soft dough. Knead on a lightly floured surface until smooth and elastic, about 6 - 8 Minutes.  Place in a greased bowl, turning once to grease top. Cover and let rise in a warm place until dough doubles, about 1 hour.

Bread Machine method: Add ingredients in this order to your bread machine; water, milk, shortening, egg, sugar, salt, flour, and yeast.  Run your machine on dough cycle.  During the initial mixing, you may want to watch the dough and add more flour as needed.

Both: Punch dough down; divide in half. Roll each half into a 15" x 10" rectangle. Mix filling ingredients until smooth. Spread half the filling on each rectangle. Roll up jelly -roll style, starting with the long end. Cut each into 15 rolls.  Place in two greased 9" x 13" baking pans. Cover and let rise until doubled, about 45 minutes. Bake at 375° for 20 - 25 minutes or until lightly browned. Mix glaze ingredients; spread over warm rolls. Yield: 30 rolls.


     I sometimes will make these in four smaller pans when I don't want to bake so much at one time.  Leave an inch or so of space between the rolls so they have plenty of room to expand.  You can make the rolls the night before and keep them in the fridge overnight, but allow a little more time for rising in the morning.  I have also frozen the uncooked rolls.  Or you can bake them and then freeze them.  Or maybe you want to eat them all at once.   Any way you do it, enjoy them! :)

Thursday, August 19, 2010

Broccoli Salad

Just a quick recipe today.  :)  This is my favorite way to eat raw broccoli.  I usually don't have to doctor broccoli up in this house, because we all like it.  Even Chance begs for it at the grocery store sometimes. :)  But I like to make this salad every once in a while.  It's great to bring to a potluck!


Broccoli Salad

2 crowns of broccoli, cut into bite size florets
1/2 cup bacon, cooked and crumbled
1/2 cup peanuts
1/2 cup raisins
1/2 cup mayonnaise
1/8 cup apple cider vinegar
1/8 cup honey

In a medium bowl, mix together broccoli, bacon, peanuts and raisins.  In a separate small bowl, mix together mayonnaise, vinegar and honey, whisk to blend.  Add to broccoli mixture and stir to coat.  Serve immediately or the peanuts and raisins will get soggy.

Tuesday, August 17, 2010

Buttermilk Biscuits!

     After making Peach Cantaloupe Butter yesterday, I just had to make some biscuits to go with it!  I have tried for years to find a good biscuit recipe.  A lot that I tried just didn't quite stack up.  So after looking at many recipes, and modifying them, I created this one.  I haven't been disappointed yet!  Someone told me that these biscuits are like the ones their grandmother used to make!  Biscuits are also a great recipe to make with your kids!  Chance loves to help me mix the ingredients, and then cut them out!


Buttermilk Biscuits

2 cups flour
1 tablespoon baking powder
2 teaspoons sugar
1/2 teaspoon cream of tarter
1/2 teaspoon baking soda
1/4 teaspoon salt
1/2 cup butter (1 stick)
2/3 cup buttermilk

Mix all dry ingredients together.  Cut in butter until mixture resembles coarse crumbs.  Add milk all at once; stir until moistened.  Turn dough out onto a lightly flour surface.  Knead for 10 to 12 strokes or until nearly smooth.  Pat to a 1/2 inch thickness and cut with a floured biscuit cutter.  Place biscuits 1 inch apart on an ungreased baking sheet.  Bake at 450° for 10 to 12 minutes or until golden.


Monday, August 16, 2010

Peaches!

Peaches are in season here in July and the first part of August.  I'd been meaning to go pick some for weeks, but things kept coming up that kept me extremely busy.  So I almost missed out this year!

Saturday we finally had a free day, so we called some of the orchards around here to see if they still had peaches.  The answer was always the same, "Sorry, we're out for the season.".  I was beginning to think we weren't going to find any!  We drove to a produce stand about 50 miles away, and they had two small boxes of local peaches left.  So I got the last of the local peaches!  And it was totally worth it!

The peaches were very ripe, so we had to put them up right away.  We blanched them in boiling water for about 30 seconds, then put them in cold water.  The peels slide right off!


My husband even donned an apron and helped me peel them!


Then I sliced them up and put some right into the freezer bags.


For some more of them I used this recipe from Where the Wild Ferns Grow : Frozen Peaches With Orange Juice.  I thought I had orange juice concentrate so I didn't buy any more.  It turns out what I had was Orange Peach Mango juice concentrate, so that's what I used.  It turned out awesome!  I let the peaches sit in the juice for a while as I finished up the other peaches, and the juice turned a pretty pinkish color with the yellow peaches peeking through.   It really is like frozen sunshine!


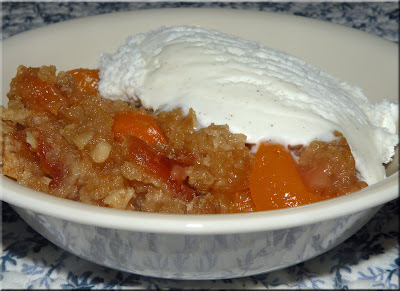
I made a peach crisp dessert with the 'frozen sunshine' peaches and it was really good served with vanilla ice cream!


Peach Crisp

4 cups peaches in juice concentrate
1/3 to 1/2 cup brown sugar
1/2 tsp salt
3/4 cup flour
1/2 cup butter
1/2 cup quick cooking oatmeal

Put peaches in an ungreased 8 inch square baking pan.  Crumble together brown sugar, flour, salt butter and oatmeal.  Spread on top of peaches.  Bake at 375 degrees for about 45 minutes or until lightly browned.  Serve with vanilla ice cream!

With the rest of the peaches I made my sister-in-law's recipe from Little House on the Prairie Living : Peach - Cantaloupe Butter.  Cantaloupes are also in season here, so this is as fresh and as tasty as it gets!


+


= Delicious!


Friday, August 13, 2010

Make Your Own Finger Paints

Chance and I had an afternoon with not much to do, so I decided to make him some finger paints. I looked up several recipes, but I decided on a cooked one since I figured that would have a smoother texture.  It ended up a little thicker than I had hoped, so next time I might add a little more water.


Chance had so much fun helping me make the paints and add the coloring, not to mention painting!


And even though the paint was a little thick, it made wonderful squishy goo to squeeze between his fingers!


I even had fun trying a little artwork.  :)


Fingerpaint

1/2 cup cornstarch
3 tablespoons sugar
1/2 teaspoon salt
2 cups cold water
food coloring

In a suacepan, combine all ingredients except the food coloring.  Cook and stir over medium-low heat until paint thickens and becomes opaque.  This can take 10 to 15 minutes.  You don't want to turn the heat too high.  Remove from stove and cool.  When it's cool, divide if you wish to make different colors.  Add food coloring as desired.  I added about 5 drops per color.  Have fun!


Another thing about this paint is that it is very washable!  And every mother knows that's a very good thing! :)

Thursday, August 12, 2010

Tropical Glazed Chicken


This is one of my favorite chicken recipes.  I love all the different flavors and textures in it.  The sauce is sweet and tangy, the avocado smooth and creamy, and the macadamia nuts give it a nice crunch.  I like to make 'theme' meals sometimes, and this is a great entree for a tropical theme!  I served it with a tropical salad, mangoes and a non-alcoholic pina-colada.

Tropical Glazed Chicken

 4 boneless, skinless chicken breasts, cut into strips
2 tablespoons oil
3/4 cup pineapple -orange juice concentrate
1/4 cup butter
1 teaspoon ground ginger
1 teaspoon soy sauce
2 medium ripe avocado
1 tablespoon lime juice
1/2 cup macadamia nuts

In a saucepan, combine the juice concentrate, butter, ginger and soy sauce.  Bring to a boil.  Reduce heat and simmer, uncovered for about 15 minutes.
Meanwhile, brown chicken strips in oil in a large skillet.  Transfer to a greased baking dish.  Make sure there is only one layer of chicken, so it all can glaze properly.  Pour or spoon the sauce over the chicken.  Bake uncovered for 25 to 30 minutes, basting occasionally.  Peel and slice the avocados and brush slices with lime juice.  Arrange chicken, avocado and nuts over hot brown rice.  And make sure you spoon some of the sauce on there too. :)


Monday, August 9, 2010

Bringing Aprons Back!

     This is the apron that started it all.  At least in my kitchen. :)
I bought this apron off of eBay a couple of years ago, and since then it has basically been a part of me.  Before I started wearing an apron, I used to always end up with greasy spots on all my shirts.  You can ask my husband, I'm not the neatest cook!  So I love my apron!  I wear it whenever I am cooking or washing dishes and it has saved many a shirt!


     Since I liked my apron so well, I decided I wanted another one.  I found some material I really liked and got a pattern.  Now, I have sewn curtains and table runners and things like that, but I have never followed a pattern before. :S  But after many phone calls to my mom I managed to make this apron!


     Then Chance decided he wanted an apron too.  I asked him what color he wanted, expecting him to say green...his favorite color.  But he said, "Blue, to match yours!"  So I got some more material, and made him a cute, simple apron.  It turns out that patterns are kind of like recipes...I can't follow them exactly, I always change things up a bit! :)


     Then I offered to make my sister one.  So I made this cute apron for her.  It's kind of addicting, really. :)


     So now I am thinking I will make aprons to sell.  At first I thought I would have to name my company 'Obviously Homemade', but by the third apron in about a week, I have a little more confidence. :)  There are a couple cute stores around here that sell home goods and kitchen gadgets, etc, so I think I will try to sell through them.  But also sell online, so if anybody wants to order an apron, let me know! :)

Friday, August 6, 2010

Salmon Salad with Creamy Lemon Dill Dressing

     Here's another great 'cool' meal for a hot day.  I really like salmon.  My husband's not crazy about it, (if I serve grilled or broiled salmon, he adds ketchup) but he does like this salad!  I usually broil enough salmon to eat a meal of hot salmon and have enough left over to make this cold salad the next day.  You can also make the salmon fresh for this salad, just allow enough time for it to cool before putting it on the lettuce.


     I have found that fresh salmon stays alot moister than the frozen kind.  But either kind works, and I often use the frozen, because that's all I can find at the store.  I like to marinade it in a little bit of olive oil and lemon juice for a 1/2 hour or so before broiling.  If you are using frozen salmon, you can also put it right in the marinade and let it thaw.  That seems to help keep some of the moisture in.

     When you are ready to cook the fish, move your top oven rack to about 6 to 8 inches from the top of your oven.  In some ovens the top position works best, and in some you  have to use the second.  Turn your oven on high broil, and leave the oven door cracked open.  Salt both sides of the salmon, and place on a broiler pan.  Broil for 4 to 6 minutes per side or until slightly brown, and fish flakes easily when you stick a fork into it.  Remove from the oven and set aside to cool.

     The dressing needs to chill and blend flavors for about an hour also.

Creamy Lemon Dill Dressing

3/4 cup mayonaise
3 tablespoons buttermilk ( you can also use milk with a little lemon juice or vinegar)
2 tablespoons fresh dill, or 2 teaspoons dried dillweed
1 tablespoon fresh chives, or 1 teaspoon dried chives
1/2 teaspoon lemon zest
2 teaspoons lemon juice

Mix all ingredients together and chill for an hour before serving.

     Meanwhile you can wash and prepare your salad greens.  I love to use butter lettuce for this salad, because the texture and taste seems to work so well with the salmon.  But you can use whatever kind you like.  Cut or tear your salad greens and arrange on the plate.  Add shredded broiled salmon, and top with the dressing.  This is great served with cucumbers, and roasted beets!  Enjoy!

Tuesday, August 3, 2010

Make Your Own Sports Drink

     Yesterday, my husband and son were out working on a pick-up truck in the heat of the day.  I kept bringing them water, but I thought they might need something more to help replace the salt and electrolytes they lost.  Since we don't keep drinks like Gatorade or Powerade around the house, I had to come up with something on my own! 

   I did have some Pop Ice freezer pops...


and some Emergen-C powdered drink mix. 


    So I filled a quart size jar about 3/4 full with water.  I put 4 orange flavored Ice Pops in the water and stirred to dissolve.  Then I added 1 packet of Emergen-C Raspberry.  I also added a few shakes of salt.   I stirred that all together and ended up having a great, cold sports drink for the guys!


  You can use any flavor of Ice Pop or Emergen-C you like...there are alot of great combinations out there!  You can also control the sugar content by using less or more of the freezer pops.  And it's great, because you get a good shot of vitamin C, plus other antioxidants, B vitamins for energy, and an electrolyte boost!  And it works out to be quite a bit cheaper than the bottled varieties you buy at the store.  Walgreens sometimes has the Emergen-C buy one get one free, so that makes for a great deal!  Enjoy!

Monday, August 2, 2010

It's Hot

It's hot.


And kinda miserable...


But that doesn't keep a three year old from having fun helping Daddy work on a truck!


Just thought I'd let you know. :)