Howdy! I can't believe it has been two weeks since I have blogged! The weather has been turning 'summery' around here, so we have been busy with all that comes with that! Here are just a few of the things that have been keeping us busy!

Since I posted about our garden, we have had several questions about our watering system, mulching methods, etc. So I asked my husband to write a post about how he set it up and and how it works. Please click on the pictures to view them larger if you want to see more detail!

Hi. I'm Loren. I'm not so handy in the kitchen, but I fix motors, and build stuff. Our simple, really basic garden plan somehow morphed into one with beds. We have been in drouth since the beginning of the year, so I figured irrigation was going to be an issue, since we are on city water. Needless to say, the garden has turned into quite the project!
I will cover the watering system first, and I should mention that I am not a irrigation expert. I have a lot of irons on the fire and consequently I have simply made something that fits our situation and allows me to “set it and forget it.” A programmable water timer makes it much easier for busy folks to have a garden.

First, I made a supply line using ¾ inch diameter PVC pipe and fittings that I ran on top of the ground as there is not an existing line and spigot to where I needed it. (I prefer gluing PVC using purple primer first, then the glue). The programmable timer is just outside the back door.

Once at the garden the I made it so that each side of the garden was supplied. There are several turn-off valves that allow us to shut off water completely, or run each side of the garden independently. I also had an problem with losing water pressure by the time I got towards the back of the garden, but I fixed that by connecting both ends to make a complete circuit around the garden.

I then used ½ inch drip line to branch off of the PVC. Each ½ inch line supplies two beds. I bent it in kind of a horseshoe shape underneath the beds. Coming off of the 1/2 inch line I used ¼ inch drip line for plant specific watering.
(I don't have a picture of this since the beds we did this in are mulched, but here is a picture of our corn patch, where we did something very similar)

In some cases, I opted to use sprinklers made for ¼ inch line- like the seed planted green beans and beets because we haven't mulched those beds and there wasn't much need to be plant specific in those cases.

The neat thing about this is that I can change anything about this watering system to fit new conditions, or additions to the garden... and I have several times. It has taken a bit of money to do, but we are using less water- or at least more of it is benefiting the plants than a regular lawn sprinkler.
A couple of money saving tips!!! If you do this sort of system, you will be spending enough money on drip line, connectors, and sprinklers. There are all kinds of little doodads out there and if they fit your needs by saving your time and or efforts, they are probably worth spending money on, but here are some things I did to avoid spending so much.
Tip 1: End clamps~ all you have to do is fold a couple inches of line back on itself. I use old baling wire or metal clothes hanger pieces to crimp around the fold to hold it. Twine or duct tape would also work.
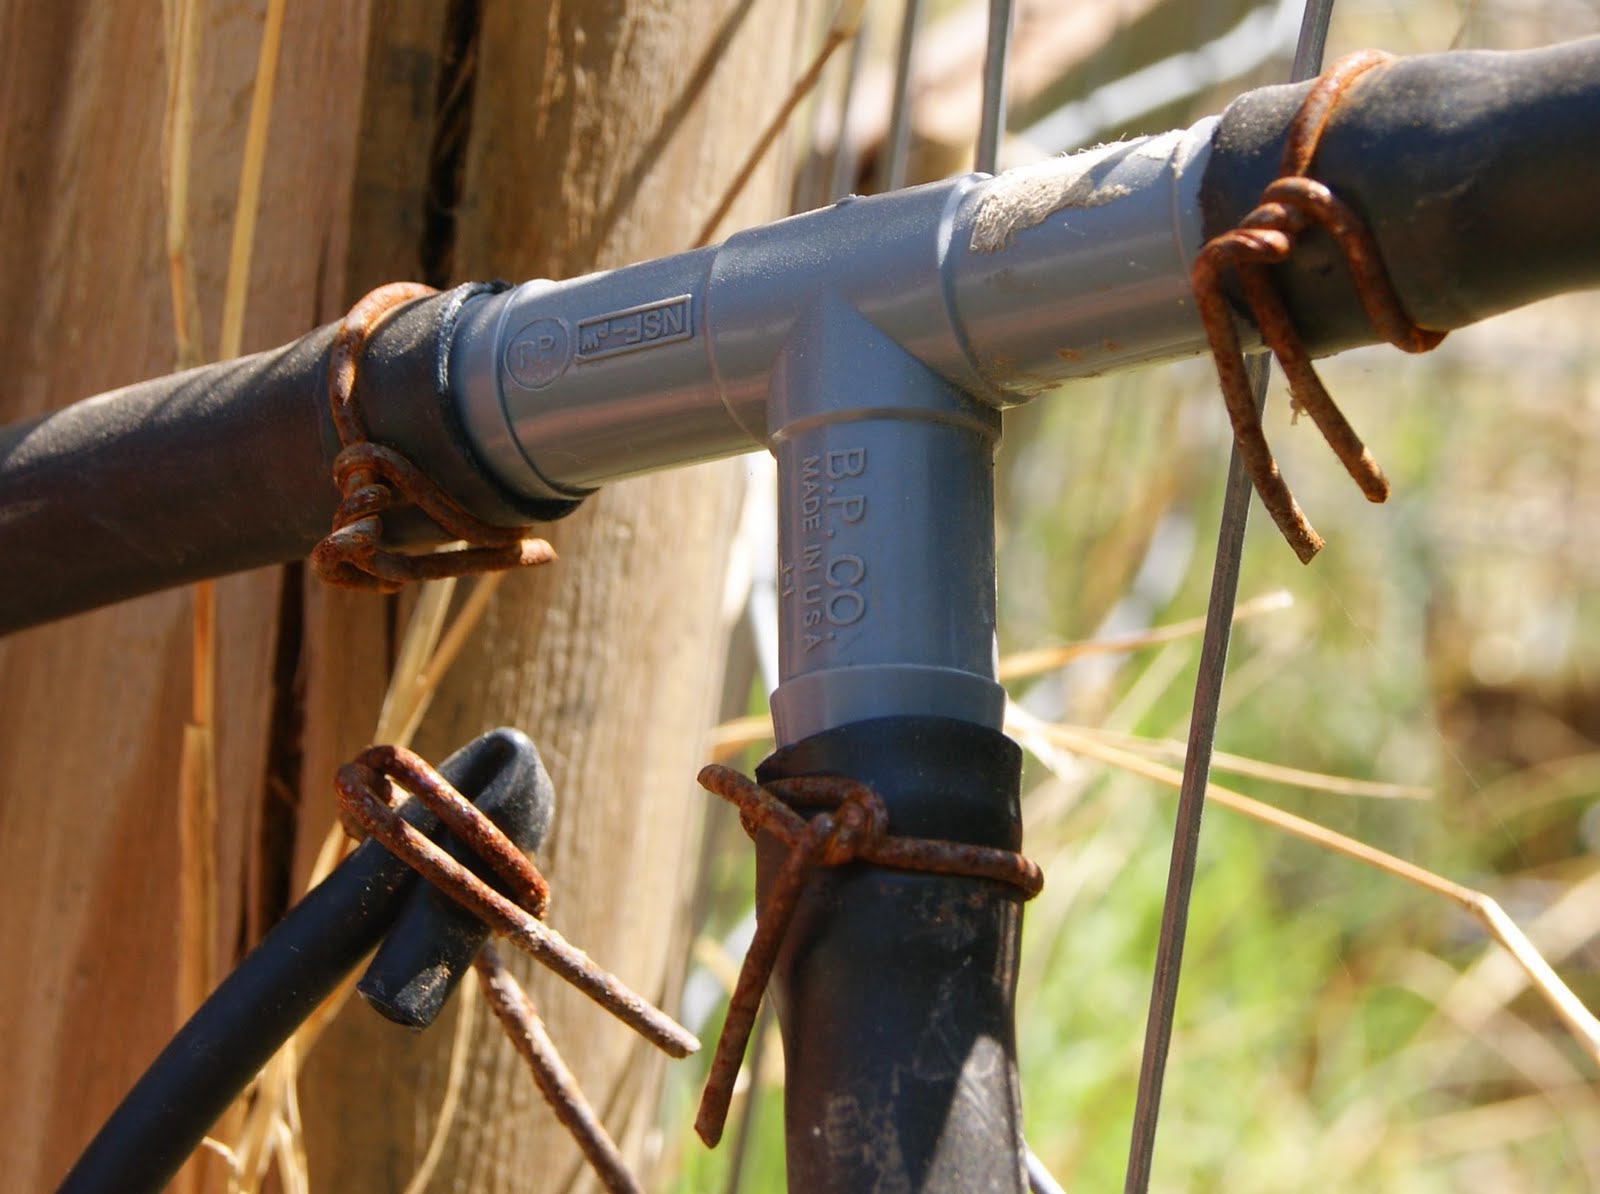
Tip 2: ½ in lines tend to come off of their fittings pretty easily when there are sudden changes in water pressure, mostly when the water system turns on and the lines are refilling. Regular hose clamps aren't cheap anymore. Here again old baling wire comes in handy. Just a loop and a couple of twists with a pair of pliers and you are in business.

Tip 3: Drippers~ unless you are concerned about being very specific/scientific about the amount of water you are putting out and want to spend a lot of money buying all those ½ and 1 or 2 gallon per hour deals, a bunch of light poke holes in ¼ or ½ inch drip lines with a thumb tack works really well. Then you can control volume and pressure of that whole run of line with a little in line valve.

Mulch: If you have a yard that gets mown regularly, use the clippings as mulch. That's what we are doing and it works great. Our mulch was mostly dead grass and dry leaves from the first cutting after winter. We have mulched in our herbs, tomatoes, peppers, peas, and side dressed the cucumbers, and squash which are in hills. The soil is cooler underneath the mulch, weeds get smothered to some degree, and the water is retained by the soil longer requiring less water usage.

Note: Using dry grass clippings, as opposed to fresh, is a good idea. This is because of the microbiological processes that take place in digesting and breaking down of your clippings. Basically, Nitrogen that is in your soil helping your plants grow also helps the microbes grow. These microbes are good things, but as microbes grow exponentially, they will use the Nitrogen faster than your plants, depleting it. Then your plants won't be as thrifty. Just use google if ya'll want an in depth chemistry/biology explanation.
I hope this answers some of your questions, but if you have any more, just leave a comment, or e-mail Rachel at domesticdoins@hotmail.com.


