Tuesday, March 29, 2011

Azure Standard Giveaway


Azure Standard is a food co-op that delivers wholesome and organic foods and produce.   You can read all about them here.  They have truck drop-off points in all of the western states and are moving farther east! 

This week they are having a giveaway on their blog!  The winner will recieve 10 Wholesome Sweeteners!  To enter, go to the Azure Almanac Blog at http://azurestandard.blogspot.com/2011/03/giveaways-dont-get-any-sweeter-than.html

The giveaway ends at 12:00 AM Saturday, April 2nd, 2011.

Monday, March 28, 2011

Southern Style Cornbread


Growing up in the Midwest, cornbread was baked in an 8x8in baking pan and was moist, sweet and cake like.  We ate it with syrup or molasses, and sometimes we even baked hot dogs in it!  But when I married a southern boy, I learned that cornbread is a whole 'nother thing down there!  In the South, cornbread is often baked in an iron skillet, doesn't have any sugar in it, and is a bit drier and coarser than the Midwest variety.  Since I married a Southerner, I had to learn to make it 'right'. :)  But over time I have learned to love this Southern staple.  Although I do add some sugar to mine... just don't tell anybody. ;)


First, pour a couple of tablespoons of oil into a large cast iron skillet.  Put the skillet in the oven and preheat the oven to 375°.  By the time the oven is preheated, your pan will be nice and hot!  Meanwhile, mix together the dry ingredients.  You can tell how much I use this recipe, I think it is the most stained one I have. :P


Add the wet ingredients and stir until evenly moistened.  Remove the skillet from the oven and pour the batter into it.  The skillet should be hot enough to sizzle and start cooking the edges.


Put it back in the oven and bake for 30 minutes.  The cornbread should come out golden brown and slightly crunchy/crsipy on the outside and soft on the inside.


Serve hot with your choice of toppings.  I love to eat it with butter and honey.  It's also a great side to a pot of beans!  Don't worry, the picture below isn't a mold science experiment, I made a batch with blue cornmeal! :)


Southern Style Cornbread

1 1/2 cups cornmeal
1/2 cup flour
1 teaspoon salt
1 tablespoon baking powder
1/4 cup sugar (optional)
1 tablespoon oil
1/4 cup milk
3/4 cup water
1 egg

Pour a couple tablespoons of oil into a large cast iron skillet.  Place in the oven and preheat oven to 375°.  Meanwhile, mix together the dry ingredients.  Add wet ingredients and stir until evenly moistened.  When the oven is preheated, remove the skillet and pour the batter into it.  Put it back in the oven and bake for 30 minutes.  Cut into wedges and serve hot.  Enjoy!

This recipe is entered in the Old Fashioned Recipe Exchange at Little House on the Prairie Living.  http://www.littlehouseliving.com/2011/03/old-fashioned-recipe-exchange-329.html

Tuesday, March 22, 2011

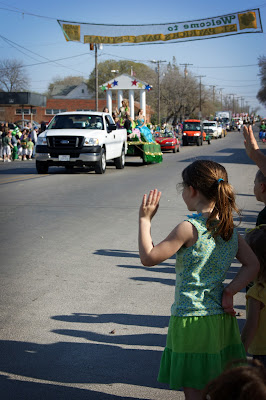
Small Town Festival


Every St. Patrick's Day weekend, our town has a big festival.  There's a stew cook-off, dog show, costume contests, and beauty pageants.  A parade, highland games, stock car races, a karaoke contest, a rodeo and a carnival.  It's a pretty big deal for a small town!  We didn't get to alot of it, because we were busy having a yard sale, but we did get to some of it!  I thought I would share some photos from a small town festival!  These are some of the things I love about a small town.

As soon as the sun came up, there were trucks and trailers and horses everywhere!  The parade started at the football field right across from our house, so we got to watch all the riders get ready!


Then my hubby handled the yard sale so I could take Chance to the parade.  There was the Dr Pepper truck...


The bikers...


The firetrucks...


The little Vaqueros...


And the bigger ones...This horse was gorgeous!


And of course, we love our Veterans!


And our farmers...


And here are the brave Scots who played the Highland Games...


And a clown...


And little princesses waving at big ones. :)


This picture had some color issues I couldn't fix, so I made it black and white.  I thought Chance's expresssion was adorable!  Of course he was part of the scramble to get the candy all the floats tossed out, so he was pleased with his sucker. :)


Then later, my husband took Chance to see the Highland Games.


Lots of men in Tartan!


And they do some really crazy stuff...


Then we all went to the carnival and had a good time!  I know it's a big waste of money, but it's worth making memories sometimes!  Chance had never been to a carnival before, and he had some gift money burning a hole in his pocket. :) 

So we blew some money on carinval food...


And Rides...


Altogether, we had a great day...the small town sort of way!

Wednesday, March 16, 2011

Tiramisu Flavored Ladyfingers


The other day I made Greek spaghetti for a company supper, with tiramisu for dessert.  My family loves tiramisu.  As one of our guests said, "It's like eating a cloud".  For those of you who aren't familiar with this Italian dessert, tiramisu is made with ladyfinger biscuits (Savoiardi), dipped in strong coffee and layered with an egg and mascarpone cheese mixture that is light and fluffy.  The ladyfingers soak up the moisture and turn soft and cake like.  I like to flavor my tiramisu with almond extract and imitation rum flavoring.

After the tiramisu was all gone (it doesn't last long around here!), I got to thinking about how I could capture the flavor of tiramisu in a more portable form...like cookies!  So I came up with this Tiramisu Flavored Ladyfinger recipe.  If you've never had ladyfingers, or have only had the store bought kind, you are in for a treat!  These are soft and cake like when they come out of the oven, but if you let them sit out overnight, (if they last that long!) they get crunchy like the store bought ones.  Yum!


Tiramisu Flavored Ladyfingers

4 eggs, seperated
1/2 cup sugar, plus 2 tablespoons
2 teaspoons instant coffee granules
1/4 teaspoon almond extract
1/4 teaspoon imitation rum flavoring
7/8 cup flour
1/2 teaspoon baking powder
1 tablespoon powdered sugar
1 tablespoon cocoa powder

Preheat your oven to 400°Line two baking sheets with parchment paper.  Set aside.  In a medium mixing bowl, beat together egg yolks, 1/2 cup sugar, coffee granules and extracts.  Beat until the coffee has nearly disolved and mixture is thick and light in color. 

In another bowl, beat the egg whites until soft peaks form.  Slowly add the remaining sugar and continue beating until stiff and glossy.  Fold half of the egg whites into the yolk mixture. 

Sift together the flour and baking powder, and fold into the yolk mixture, then fold in the remaining egg whites. 

Now, you have a couple of options.  You can put the batter into a large pastry bag with a 1/2 inch round tube, and pipe the cookies onto the parchment, about 4 inches long, and a couple inches apart.  Or if you don't care about having the classic ladyfinger shape, you can just spoon the batter into rounds on the parchment paper.

Bake for 8 minutes.  Remove from oven.  Mix together powdered sugar and cocoa powder, and sprinkle over the cookies.  Cool a while before transferring to a cooling rack to dry overnight.

This recipe is entered in the Culinary Smackdown Battle at http://utry.it/2011/03/culinary-smackdown-battlecookies.html.  Go browse all the wonderful cookie recipes this month!

This recipe is part of the Recipe Exchange at Little House on the Prairie Living. http://www.littlehouseliving.com/2011/03/old-fashioned-recipe-exchange-322.html


Monday, March 14, 2011

100


I remember being a kid, when 100 was a HUGE number.  I remember when 100 dollars felt rich.  When 100 dolls, or toy cars, or stuffed animals was absolutely unimaginable.  I wouldn't have known what to do with 100 outfits.  And I probably only knew about 100 people.

Well, now, $100 dollars doesn't even pay one bill.  My son probably has 100 toy cars, 100 train track pieces and hundreds of books.  I have way more than 100 outfits.  And I know hundreds of people.  It's amazing what 20 years will do!

You probably wonder what brought these thoughts about.  Well, I have been reading some minimalist blogs and articles.  I am not ready to jump in head first to the minimalistic lifestyle, but there is a lot about it that appeals to me!  It is amazing to me how much our perspective has changed in even the last 20 years or so!  We are so set on buying new things and collecting stuff, that we just don't realize how much STUFF we really have!

  Seven years ago, when we were newly weds, we moved with a halfway full 4 ft by 6 ft u-haul, and a Ranger pick-up.  And part of what was in the u-haul was a motorcycle, so you can tell how few possessions we had in that trailer!  But in the past 7 years, we have filled up a 3 bedroom house, plus a two car garage with STUFF!  And after moving all the stuff several times, we've just about had enough!

I have been realizing this more and more, because in the last few weeks, I have been sorting stuff to sell at a yard sale.  I have set a goal when it comes to sorting my clothing.  I want to get rid of all but 100 items of clothing.  I'm not talking about socks and shoes and underclothes, but shirts and skirts and jeans, etc.  I have read some blogs where they had 100 personal items, which included their clothes, shoes, toothbrushes and everything.  But I don't think I could handle that! 

I think my goal of 100 is attainable for me right now, but it is sure harder than it sounds!  I have spent today sorting through my dresser and closet, and so far I have over 100 items to get rid of and I'm still not down to my 100 to keep!  Just for perspective, here is a picture of about 50 items of clothing that I am getting rid of...


It is hard for me, because (my husband would be happy to tell you) as a woman, I have the memory of an elephant!  I remember where I was and who I was with when I bought a lot of these items.  I remember different occasions where I wore them.  So I am really having to keep sentiment out of it! 

Just remember, if you haven't worn something in a year, you probably won't wear it this year either!  If you are holding on to clothes that are too small for you, but not seriously doing anything about losing weight, get rid of them!  Half the fun of losing weight is shopping for new clothes!  And if you shop at thrift stores, it's not that expensive to replenish your wardrobe every once in a while.  When you buy something new, try to get rid of something old that you haven't worn in a while.

And think, if we get down to 100 items of clothing per person, the laundry pile is going to shrink!  I have a problem with that around here, because we have a REALLY small stacked washer and dryer set.  And you can only run one of them at a time.  So it takes a long time to do laundry around here!  If I don't have so many clothes to wear, I won't have as many to wash either! :)

The same goes for other aspects of your houshold.  I have gone through my kitchen and got rid of all my doubles.  Who needs two salad spinners anyway? :)  Keep only what you use on a monthly basis.  I read an article that said to throw all your kitchen gadgets into a box and when you use one, put it back in the drawer.  What's left in the box at the end of the month are specialty items that you use once a year or so, (like a turkey baster) and you can put them in the drawer.  But then what's left are things you just don't use anymore.  Get rid of them!

We all need a little moral support when it comes to getting rid of things, and changing the way we look at STUFF.  So I hope this helps!  I'd love to hear how you control the clutter and the amount of stuff in your house!

P.S. I was just sorting through an old purse so I could sell it, and found a fortune cookie slip that says
 "Do not desire what you do not need"
It's a good thought to keep in mind!

Saturday, March 12, 2011

New Camera!


As most of you know, I love taking pictures.  I have been taking pictures since I was a pre-teen, starting with just basic film cameras and gradually updating to nicer digital ones.  Up until this point, I have always used a point and shoot.  I have gotten some pretty good pictures with the cameras I've had, because I have learned to make them do what I want them to do. :)  All the pictures on my blog up until now have been taken with my Nikon Coolpix P80. 


 Like this one...


Overall, I have been fairly happy with my Nikon.  It is a 10.1 megapixel camera with 18 power optical zoom, which I loved.  It takes excellent photos outdoors and in good lighting situations.  But I found that indoors and in low lighting situations it had a hard time focusing, and I pretty much needed to use a flash.  And also as time went on, it seemed to have more of a problem focusing, even in lighter situations.  I did love the macro setting, and got a lot of great close-up pictures using it! 


But, last week, my in-laws called me and told me they had a new DSLR camera for me, sitting on their table.  What a surprise!  I have been wanting to upgrade to a DSLR, but we haven't really been able to afford it, and to tell you the truth, I was a little intimidated.  I really had no clue what to do with the aperture and shutter speed and ISO settings.  But I was very excited to give it a try! 


I got the box in the mail yesterday and opened it to find a Sony a390L camera with two lenses...a 18-55mm standard zoom lens and a 55-200mm zoom lens.  Sony's are pretty good cameras, and this one is a great beginner camera because it is so easy to use and understand.  I talked with a professional photographer today and he went over the camera and settings and everything with me.  So now I am anxious to practice and get comfortable using my new DSLR camera!  Hopefully from now on the pictures on my blog will be taken with the Sony.  Here are a couple of the first pictures I took with it today!


It looks like spring around here, doesn't it? :)


Have a great weekend!

Tuesday, March 8, 2011

Moroccan Sweet Potato Pitas


When I was thinking of another recipe I could make for the Sweet Potato recipe contest, I had the idea to make these Moroccan Sweet Potato Pitas.  In fact, the idea came to me right about bedtime and it kept me up half the night thinking about it!  I'm a little weird like that...my mind is constantly thinking how to make or improve a recipe! :)  I had a recipe for Moroccan Chicken, and I thought those spices would go excellent with sweet potatoes!  I was right!  These pitas are delicious and filling and make a great meal all by themselves!


Moroccan Sweet Potato Pitas

3 cups sweet potatoes, cut into 1/2 inch cubes
2 tablespoons olive oil
1/2 cup water
1/2 cup tomato juice
2 tablespoons butter
1 teaspoon ground cinnamon
1 teaspoon ground cumin
1/2 teaspoon cayenne pepper
Pita bread

In a large frying pan or wok, sauté sweet potatoes in oil until tender on the inside and slightly crisp on the outside.  In a separate saucepan, mix together remaining ingredients and bring to a boil.  Turn down the heat, and simmer for about 5 minutes.  When the sweet potatoes are tender, pour the sauce over them and stir to coat.  Serve warm in pita bread.


I know I'm mixing cuisines here, but I ate mine with hummus and thought it was great!  My husband teases me for closing each blog post with "Enjoy!" but that's what food is for, right? :)  Enjoy!

Tuesday, March 1, 2011

Decorating on a Budget: Wall Art


When I decorate my house, I don't have alot of money to work with.  I buy alot of my decor at thrift stores or garage sales, or make it myself.  But there is one thing I have noticed that is hard to find for a bargain....large pictures or paintings (that I like :P).  Most of the pictures you find at thrift stores are outdated and faded.  And if they are quality paintings, they usually still want alot of money for them!  Sometimes you do get lucky though, so don't stop looking!  I found this 2 ft by 3 ft Michael Humphries canvas for $10!  (I had to take the photo at such an odd agle to prevent flash glare, sorry!)


But when you have a particular idea in mind, it is often hard to find what you are looking for at a price you can afford!  So here is my cheap trick to get large and impressive art on your wall!  When I was decorating our bedroom, I had a blank white wall above our bed, and I wanted a large picture there.  I knew I couldn't afford to buy framed artwork, so I simply nailed this $15 large fleece throw to the wall! 


I know not everybody wants a bear over their heads when they sleep. :)  But there are so many different fleece blankets, or tapestry throws to choose from!  My mother made a frame out of 1in x 2in strips of wood, and stretched a western tapestry over it, stapling the edges to the back.  And just like that she had a big picture that makes a big impression!


Tapestry blankets typically run from $15 to $60.  You can also take tapestry pillows, take the stuffing out, and nail them to the wall like a picture!


Hopefully this has given you some ideas!  Have fun and save some money decorating!